
Personally, I think with the right piece of
furniture, lettering or images can really enhance rather than “destroy” a
furniture. I totally agree that there are
times when it is better to restore than to paint over. Unfortunately, those that I think are worth
restoring are usually completely and utterly out of my budget range. So I ended up with the scrape furniture that
people just wanted to toss out on Craigslist.
Which is why I only showcase painted furniture on my blog.
At the request of a reader, I am sharing how I transfer
images to furniture. I have
experimented with various methods in the past. Some I have heard about but have yet to tried. They
all have their pros and cons. You will be the judge of which works best for you.
“Stone Age” technique:
If you want to do image transfer on a pinch and don’t mind
the extra, extra, extra work then this one has your name written all over it.
The awesome thing about this method is that there is a 99.9% chance you already have
all the supplies you need. I used this technique on
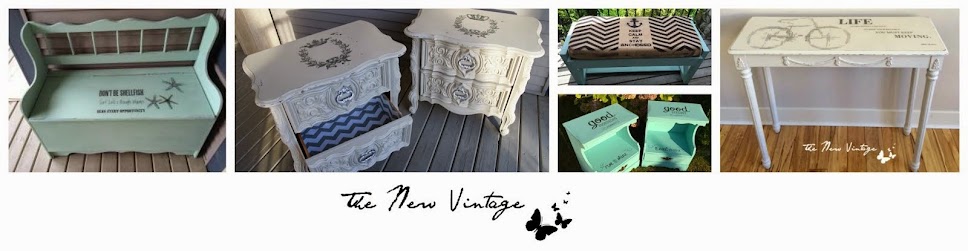
my “Family Tree nightstands” project.
1. Print the image on paper.
2. Flip the paper over and cover the back of the image with pencil marking. This is a DIY carbon transfer paper.

3. Turn the paper over and start tracing the outline onto the furniture.
4. You will be left with an outline you've just traced previously.


5. Once you've done tracing, color with permanent marker. And there you have it!

“Bronze Age” technique:
This is a slightly improved version of the “Stone Age”. This technique requires gift wrapping tissue
paper and a permanent marker. The main
area of improvement comes from not having to use elbow grease to create DIY carbon
transfer paper. However, if
you don’t have tissue paper handy, AND you don’t want to waste your elbow
grease like the “Stone Age”, then may I suggest the “Modern Day”
technique.
1. Pretty much the same as "Stone Age". You start by printing the image on paper.

2. This is where the tissue paper come in... because of the semi-transparent nature of tissue paper, you can trace the image onto it. And then use a permanent maker to transfer the image from the tissue paper onto the furniture. As you trace with a permanent marker, the ink will bleed though and right onto the furniture.

3. Color the traced image with permanent marker.


Modern Day technique
I have never used this technique myself but I have no doubt
it will work. It is basically the same
as “Stone Age” except you just buy the carbon transfer paper from a stationary
store rather than DIY. The rest is the
same. If you don't mind spending a little $ and time visiting a stationary/craft store, then this technique would make the most sense.
Freehand technique
Alternatively… If you a gifted artist, which I am not, you
can probably do away with all these gadgets and go right to drawing images
directly on the furniture. I only
attempted this once and got lucky… The final outcome definitely is not as good as tracing a printed image.

Overhead Projector technique
For a very large image such as a wall mural, you can print
the image on a transparency paper and project it using an overhead
projector. I have never used this
technique but my friend did. She used it
to project an image of a tree similar to mine onto a wall. She then traced the outline with a pencil and
painted it. The problem is that not everyone
owns an overhead projector but maybe you do…
Mod Podge technique
I have used this technique on several projects. There are many versions out there and you can easily find many good tutorials on Google. Here is a quick summary of how I do mine: 1) print a MIRROR image on paper using a laser printer.
2) Cover the image with Mod Podge and attach the paper to where I want the image appear. Smooth out the Mod Podge/furniture contact as much as possible so it will adhere properly.
3) Let it dry over night.
4) Moist the paper (not soak) with water and rub off the paper by hand. Only rub off what you can and let dry. Repeat until all paper residual has been removed. This is critical! If you don't remove the paper bit by bit, or divide and conquer, you will end up removing not just the paper residual but also the image as well.
My main complaint with this is the finish. The Mod Podged image is not flat, therefore, leaving the finished surface bumpy and rough. You could try to coat the entire surface with several layers of Mod Podge to level it like I’ve done with my console table below. Personally, I don’t recommend this unless bumpy/rough surface is not a concern such as the case with most vintage style furniture.

Blender Pen technique
Finally, there is this blender pen technique that I’ve yet
to try. I will let you know how it goes
once I get the chance to try it. 

No comments:
Post a Comment